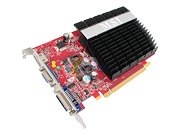
 Friday night, at 10:30pm of course, I decided to finally take the time to install the new video card in the PC connected to the HDTV in the living room. (See this post as to why.) So, new graphics card in hand I read the directions and opened up the case. Inserting the card into the slot was the easy part. The hard part was connecting the digital audio cable to the SPDIF input on the motherboard. This was needed since I was going to be using the HDMI out on the card to connect to my receiver and therefore the TV. (The HDMI cable gives me both full 1080p video and up to 7.1 digital audio so that of course was the best option.) The SPDIF cable had a single plug to connect to the video card and two wires, one orange (audio) and one black (ground) to connect to pins on the motherboard. And there was the snag, I had no idea where the SPDIF pins were on the motherboard. So, off to the Internets…
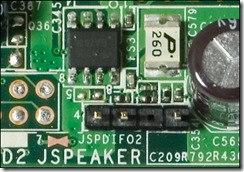
 I was able to find specs for my motherboard. All of which said that there was SPDIF inputs but nothing said where it was located. Finally on the Gateway site I was able to dig up an image of the pins.
Great, this confirms they exist but don’t tell me where they’re located. I poked around a bit and eventually found the pins, along the bottom edge of the motherboard hiding under some power cables and behind the modem board. So, just to find them I had to unplug said power cable and remove said modem card just to be able to see the darn pins, let alone connect wired to them.
Ah, but then the next problem: which pins are which? Oh, and notice that there are actually three pins and I’ve got two wires. Back to the Internets…
I was able to find a post by someone in a similar situation and he said that the audio cable needed to connect to pin 1, and ground to pin four. Not that he said, nor does the image or motherboard specify which pin is which. And, of course, the directions for the video card say that if you connect the pins wrong you might fry the card. Nice.
Hop on to chat and contact Gateway support. I get through quickly but they can’t/won’t help since I’ve got a refurbished machine. Please call this other number. That other number is only staffed M-F 9am-5pm. No help there.
So, I guess. Pin one must be on the left and pin four on the right. Made sense. Connected everything, and turned it all on, fingers crossed.
The computer booted and I had video at 640×480. (On an 1080p HDTV remember.) Install the drivers, update the drivers, reboot a few times and I’ve got full 1080p. And no audio.
Pull cards and cables and swap the orange and black wires. Boot. No audio. Shutdown, try orange on the second pin, black on the fourth. Boot. Still no sound. Hmmm….
Back to the Internets and I find some others in a similar situation. Whoops! I’ve now technically got two sound cards in my computer: One on the motherboard and one on the new card. Check Window’s sound setting and set the new card as the default audio device. Yea! I’ve now got sound!
 So, let’s test a Blu-Ray disc to make sure I’ve fixed the original problem, dealing with the HDCP problem. Well, that problem was solved but I had no audio while playing Blu-Ray discs. Since I know Windows isn’t the problem any more I figured it might be the Blu-Ray player software. I found its audio settings screen and say that I needed to tell it to output the audio via SPDIF. Set that, clicked OK, and my sound works in full digital surround.
Total time: 2 hours. Results: Priceless.

You are such a GEEK!